
Welcome to “How to Outline Text in Google Slides: Simple Steps to Enhance Your Presentations.” Text outlining is a versatile design technique that can make your slides more visually appealing and improve readability. This guide provides easy-to-follow steps for mastering this skill and creating compelling presentations.]
To outline text in Google Slides, select the text, click “Format” in the top menu, choose “Text outline,” and customize the outline color and thickness. This technique enhances text readability and visual appeal, improving the overall impact of your presentations.
Reading this article on “how to outline text in Google Slides” outlining text in Google Slides is essential for those looking to elevate their presentation design. Learning these simple steps can significantly enhance the visual impact and readability of your slides, making your presentations more engaging and effective.
See Also: Bixby Vs Google Assistant | Compared And Reviewed
Contents
- 1 Understanding Text Outlining in Google Slides
- 2 Step-by-Step Manual for Illustrating Text Using Word Art
- 3 Elective Technique: Using Text Box for Text Framing
- 4 How to Outline text in google slides
- 5 Regularly Posed Inquiries About Text Framing in Google Slides
- 6 Investigating Normal Issues with Text Illustrating
- 7 Extra Tips for Imaginative Text border google slides
- 8 FAQS
- 9 Conclusion
Understanding Text Outlining in Google Slides
Text framing in Google Slides is an incredible asset that can upgrade the visual allure and clearness of your introductions. This segment investigates the idea of text framing and its significance in making successful slides.
What is Text Illustrating, and Why is it Required?
Text framing includes adding a boundary or “layout” to the text in your slides. This line can be modified concerning tone, thickness, and style. Here’s the reason text illustration is required:
Clearness and Meaningfulness:
Illustrating text works on the lucidness of your substance, particularly when put on occupied or vivid foundations.  It makes an unmistakable limit around the text, making it stick out.
Explore a different formatting feature for enhancing text in Google Docs; check this to learn how to Double-underline in Google Docs.
Accentuation and Visual Progressive System:
Text illustrating permits you to accentuate explicit words, expressions, or headings. This outlines a visual order in your slides, directing the crowd’s thoughtfulness regarding central issues.
Differentiation and Style:
By choosing the right layout tone and style, you can make a difference and feel, making your text outwardly engaging and paramount.
Consistency:
Text illustrating can be used reliably throughout your show, guaranteeing a firm and expert look.
The Visual Effect of Text Illustrating on Introductions
The visual effect of Text framing on introductions is huge. Here are a few key ways it improves your slides:
Upgraded Lucidness:
Text framing expands the differentiation between the text and the foundation, making it more straightforward to peruse, even in good ways.
Featuring Central issues:
Framing allows you to notice significant words or expressions, making them more observable and noteworthy for the crowd.
Proficient Appearance:
Very much-planned Text frames give your slides a cleaned and proficient look, supporting your Text’s validity.
Working on Visual Equilibrium:
Text illustrating keeps up with visual equilibrium in your slides, forestalling packing and guaranteeing a spotless and coordinated appearance.
Step-by-Step Manual for Illustrating Text Using Word Art
This segment gives a bit-by-bit guide on the most proficient method to frame text involving Word Art in Google Slides, including getting to Word Art, modifying text, and reasonable tips for powerful illustrating.
Getting to and Using Word Art in Google Slides
To get to and use Word Art in Google Slides, follow these means:
1. Open Google Slides: Start by opening your show in Google Slides.
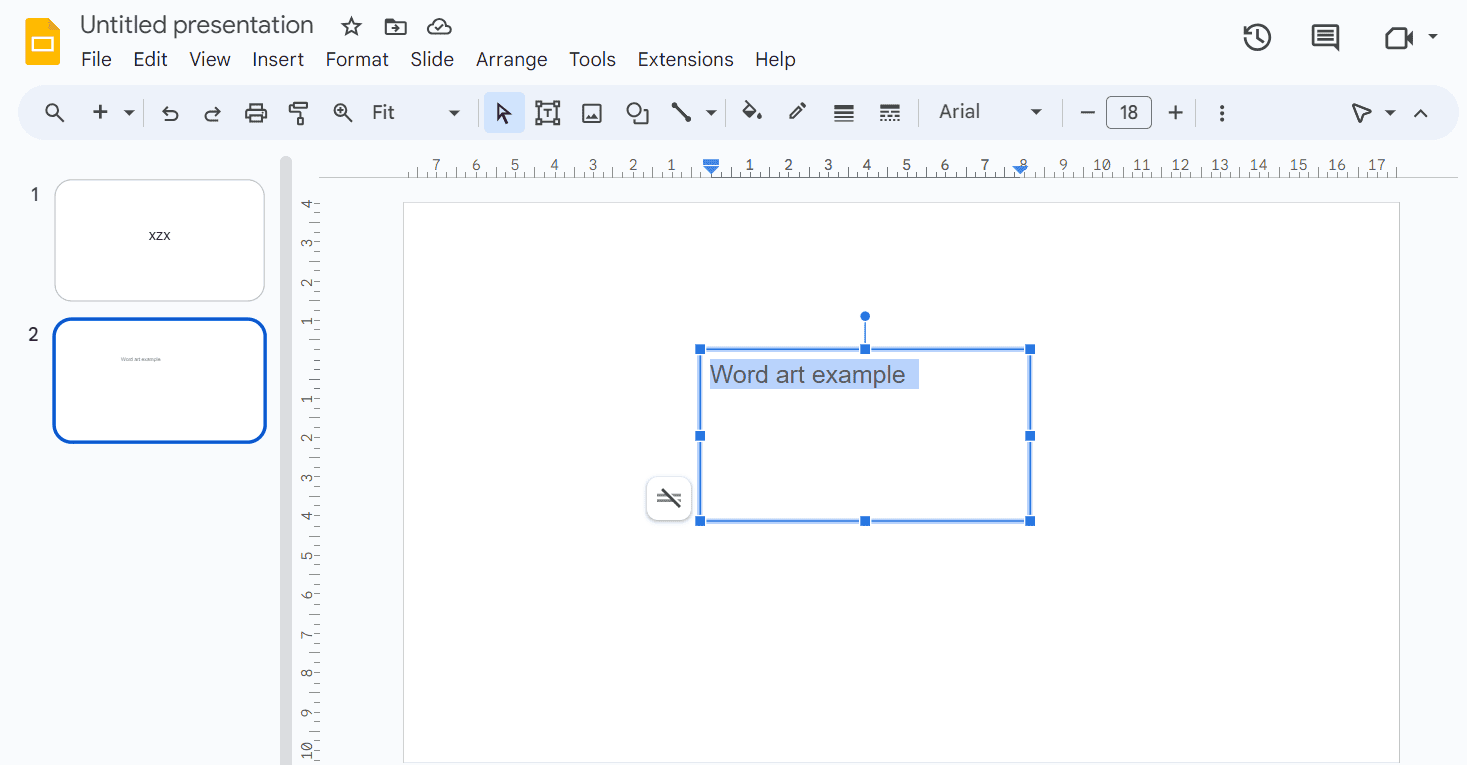
2. Embed Text Box: Click “Text box” from the toolbar and draw a text box where you need to add your text.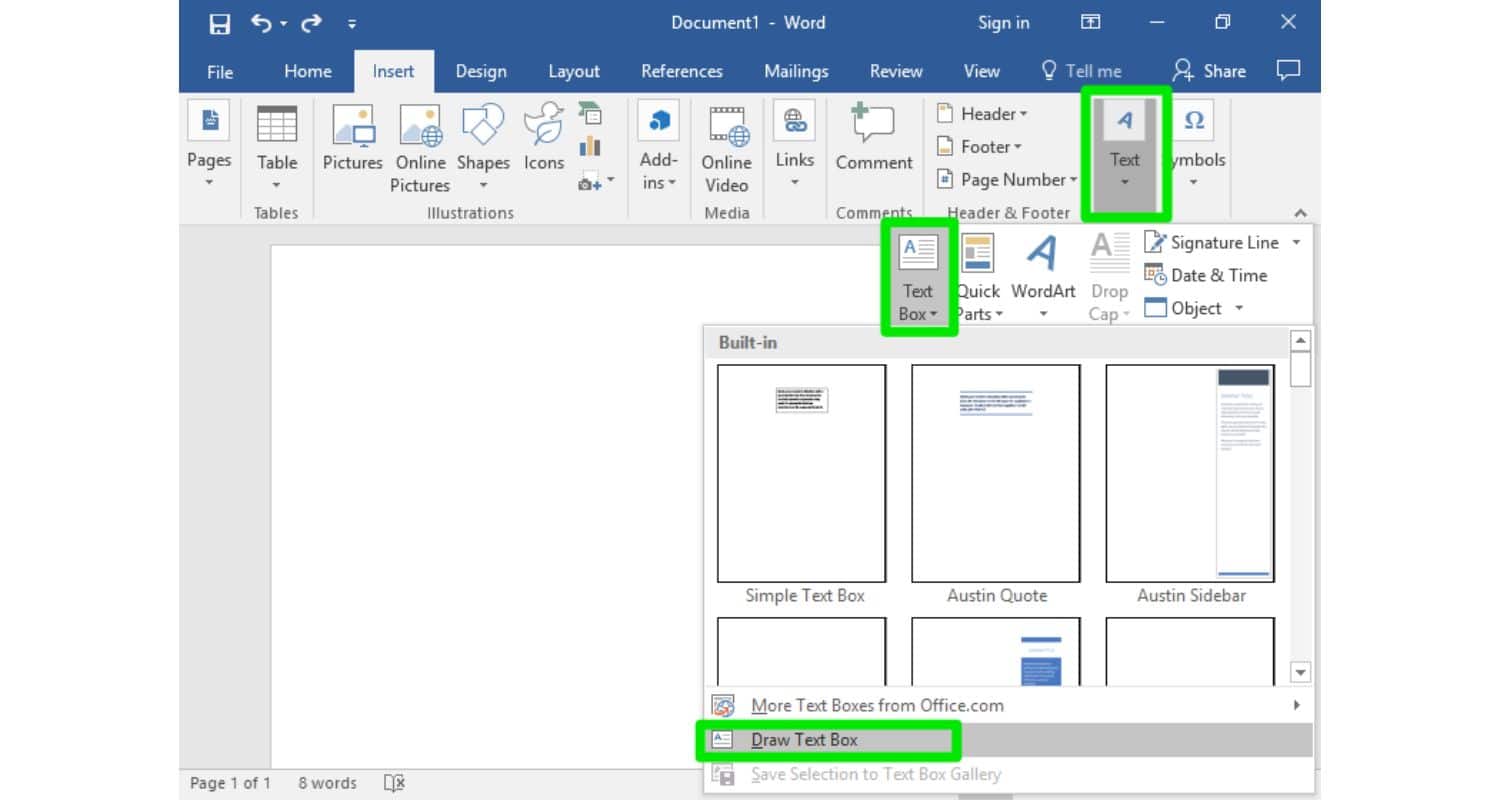
3. Enter Text: Type the text you need to frame into the text box.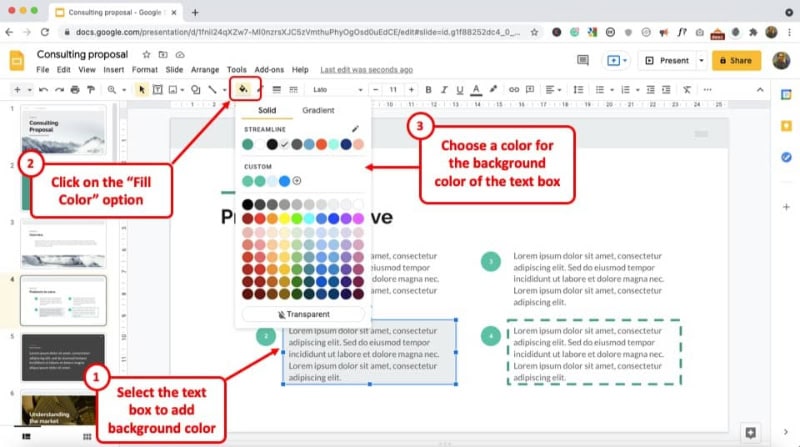
4. Access Word Art: With the text chosen, go to “Addition” in the top menu, then, at that point, select “Word Art.”
5. Pick a Style: A Word Art box will show up with different text styles. Select the one you like or that best suits your show.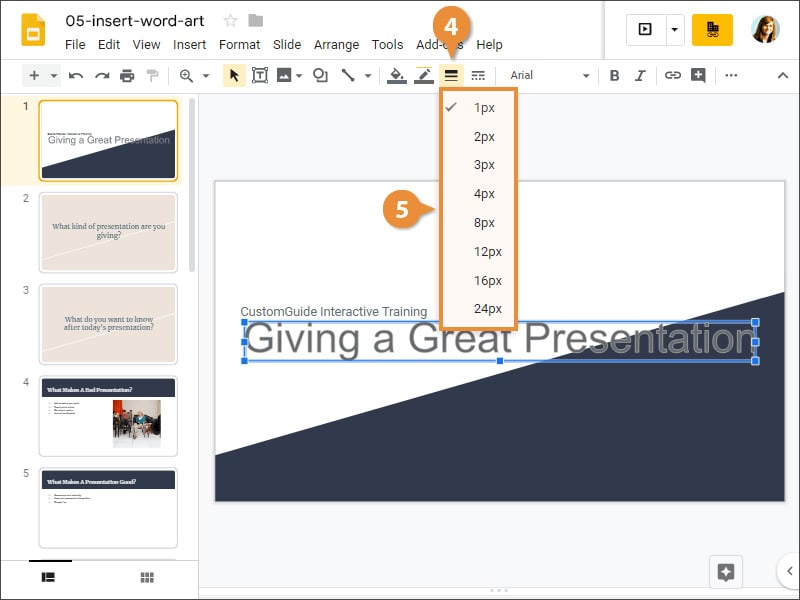
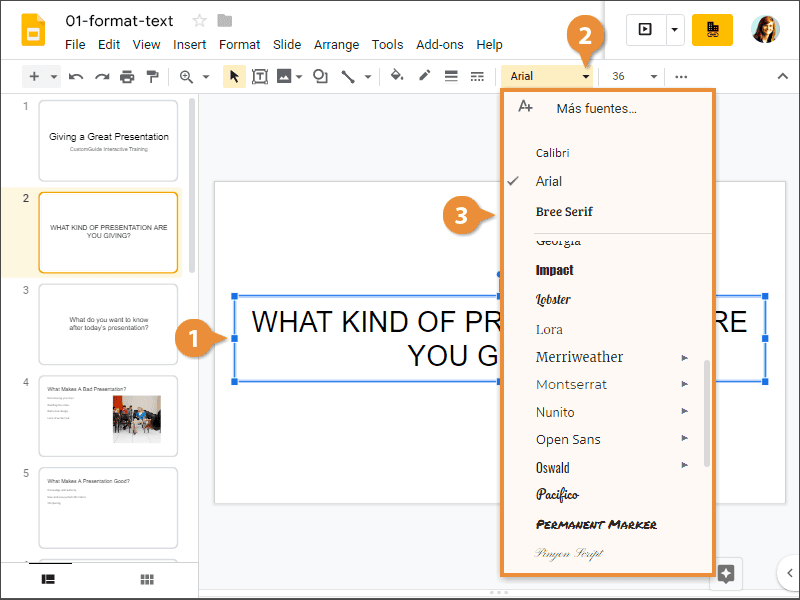
6. Alter the Text: You can alter the text, change the textual style, size, and variety, and add any extra design you want.
Modifying Text with Different Styling Choices
Modifying your illustrated text with various styling choices can improve its visual effect. This is the way to make it happen:
1. Frame Tone: Click on the illustrated text and select “Diagram tone” to pick the shade of the line. This ought to appear differently concerning the foundation for comprehensibility.
2. Frame Weight: Change the thickness of the diagram by choosing “Framework weight.” A thicker layout can make the text stand out more.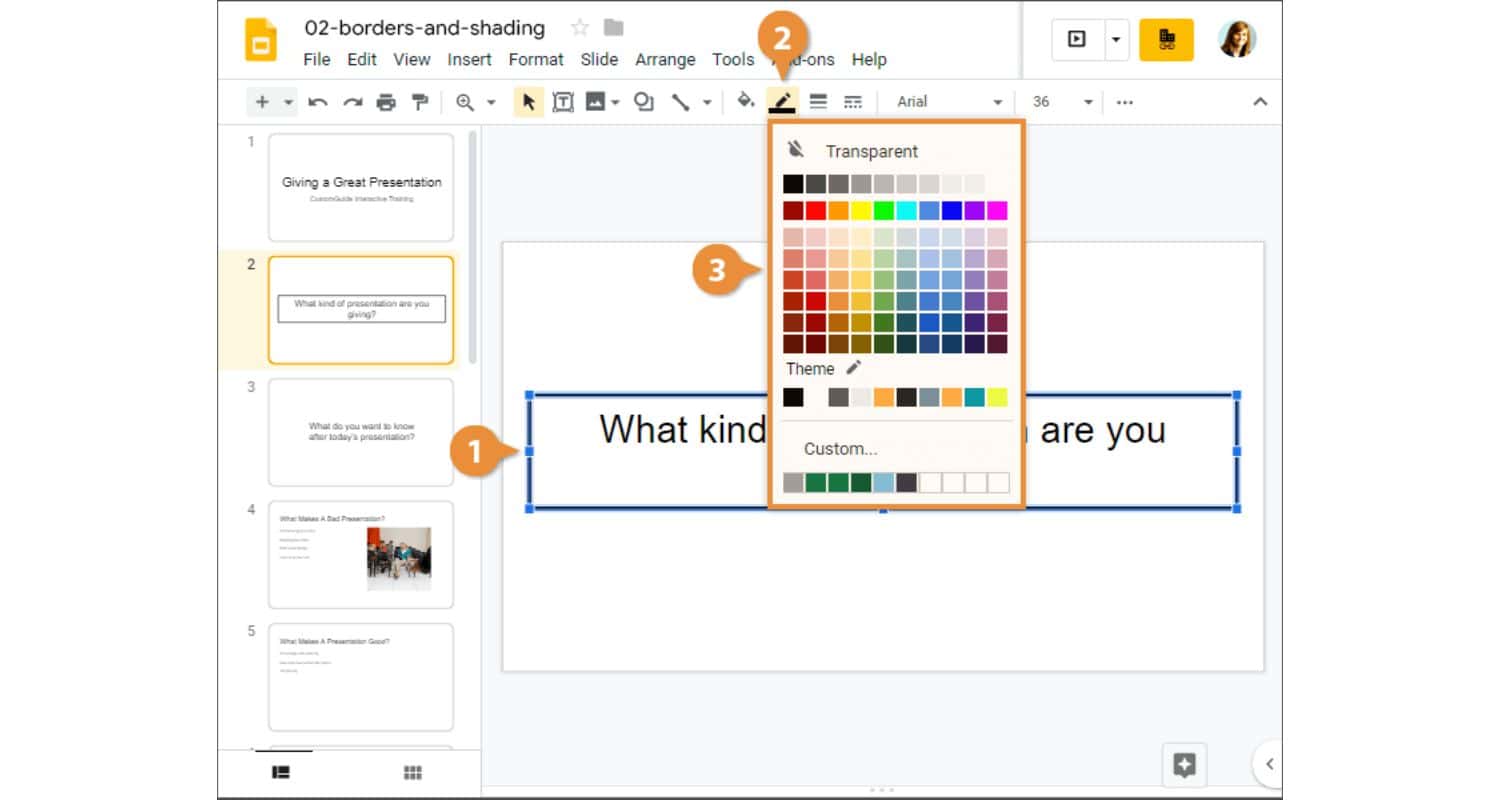
3. Text Fill Tone: You can change the shade of the text by choosing “Text fill tone.” Ensure it supplements the diagram tone.
4. Text Impacts: Investigate “Text impacts” to apply extra special visualizations like shadows, reflections, and 3D revolution to the text.
5. Arrangement and Dispersing: use the arrangement and separating instruments to guarantee your text is appropriately situated and dispersed inside the text box.
Viable Tips for Compelling Text Framing with Word Art
Here are a few viable tips for successfully framing text with Word Art in Google Slides:
Contrast is Critical:
Guarantee that the layout tone and the text fill tone give sufficient difference to clear lucidness. A dull blueprint on a light foundation or the other way around functions admirably.
Consistency:
Keep a reliable diagram style and variety throughout your show for a strong look.
Try not to Go overboard:
Avoid abusing text framing; save it for central issues or headings to forestall overpowering the crowd.
Review and Test:
Continuously see your slides and test their comprehensibility from a distance to guarantee the illustrated text sticks out.
Portable Similarity:
Consider how your illustrated text will show up on cell phones, as the Text size and style might require change for more modest screens.
Elective Technique: Using Text Box for Text Framing
While Word Art is a typical device for text framing, Google Slides offers an elective strategy using Text Boxes. This part gives experiences in embedding and arranging Text Boxes and styling text inside them.
Embedding and Arranging Text Box in Google Slides
Text Boxes in Google Slides offer an elective method for making illustrated text. This is the way to embed and organize a Text Box:
Embed a Text Box:
- Open your Google Slides show.
- Click “Supplement” in the top menu.
- Select “Text box” from the dropdown menu.
- Snap and haul to make a Text Box in your slide.
Enter and Arrange Text:
- Type your text into the Text Box.
- Select the text inside the Text Box to design it.
- Use the top toolbar to modify the text style, size, variety, and other organizing choices.
Situating the Text Box:
- Snap and drag the Text Box to situate it anywhere you need on the slide.

- Use the arrangement and separating choices in the toolbar to calibrate the position of the text.
Styling and Situating Text Inside a Text Box
Styling text inside a Text Box is urgent for viable text illustration. This is the way to style and position the text inside the Text Box:
1. Text style and Size: Tweak the text style and size to make the text stick out. Pick text styles that are effectively decipherable, and change the size for clarity.
2. Text Tone: Select the text and pick a variety that greatly differs from the foundation. This guarantees comprehensibility.
3. Foundation Tone: You can add a foundation tone to the Text Box to make a strong setting for the text. Ensure the foundation variety supplements the general slide plan.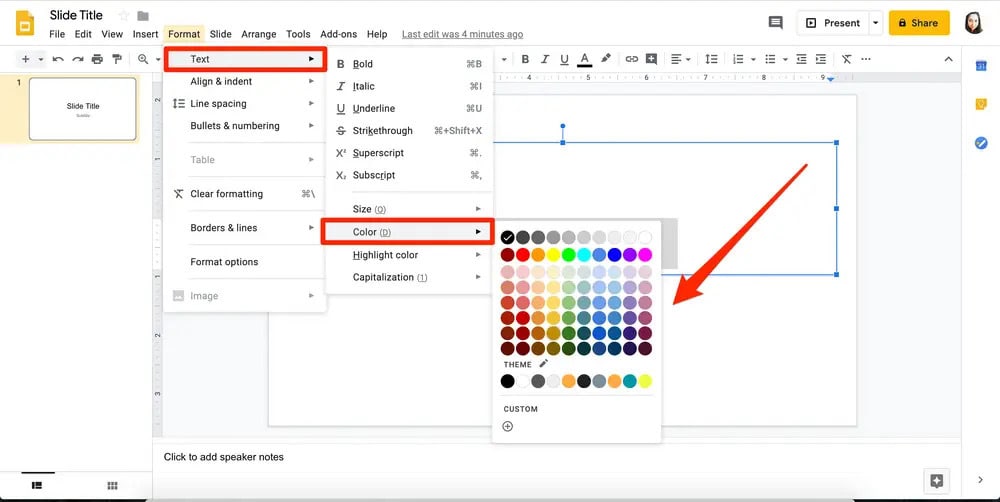
4. Intense or Italics: use intense or italics to stress explicit words or expressions inside the Text Box.
5. Line Separating and Line Level: Change line dividing and line level to guarantee the text is dispersed and simple to peruse.
6. Borders: You can add a line to the Text Box, successfully illustrating the text inside it. Alter the line tone and thickness.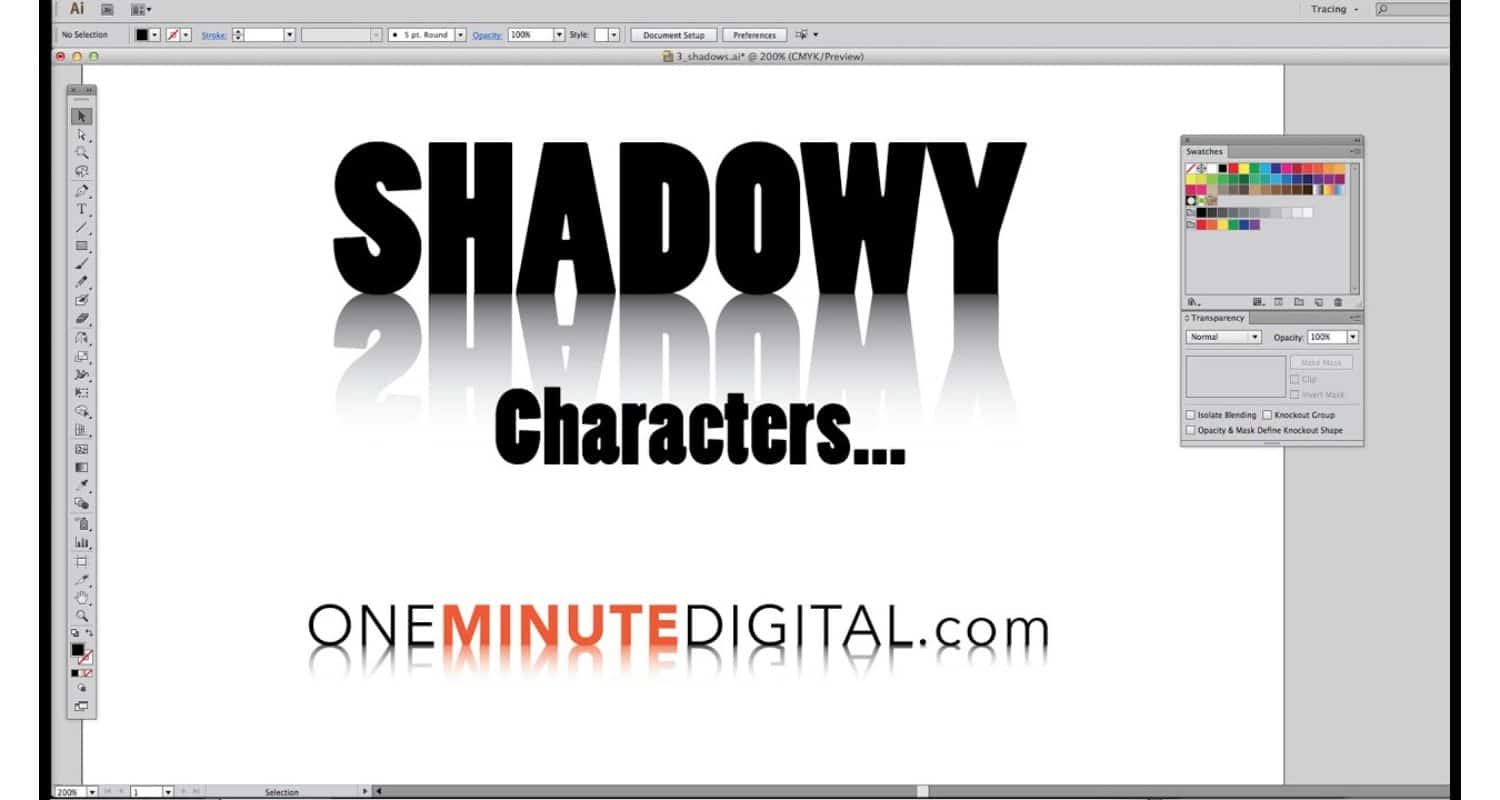
7. Shadows and Reflections: Apply shadows and reflections to the text inside the Text Box for a three-layered impact.
How to Outline text in google slides
High-level text illustrating procedures in Google Slides can take your introductions to a higher level. This segment investigates strategies, for example, adding shadows and reflections to Text and altering line styles.
Adding Shadows and Reflections to Text
Shadows and reflections add profundity and visual enticement to the text. This is the way to apply these impacts in Google Slides:
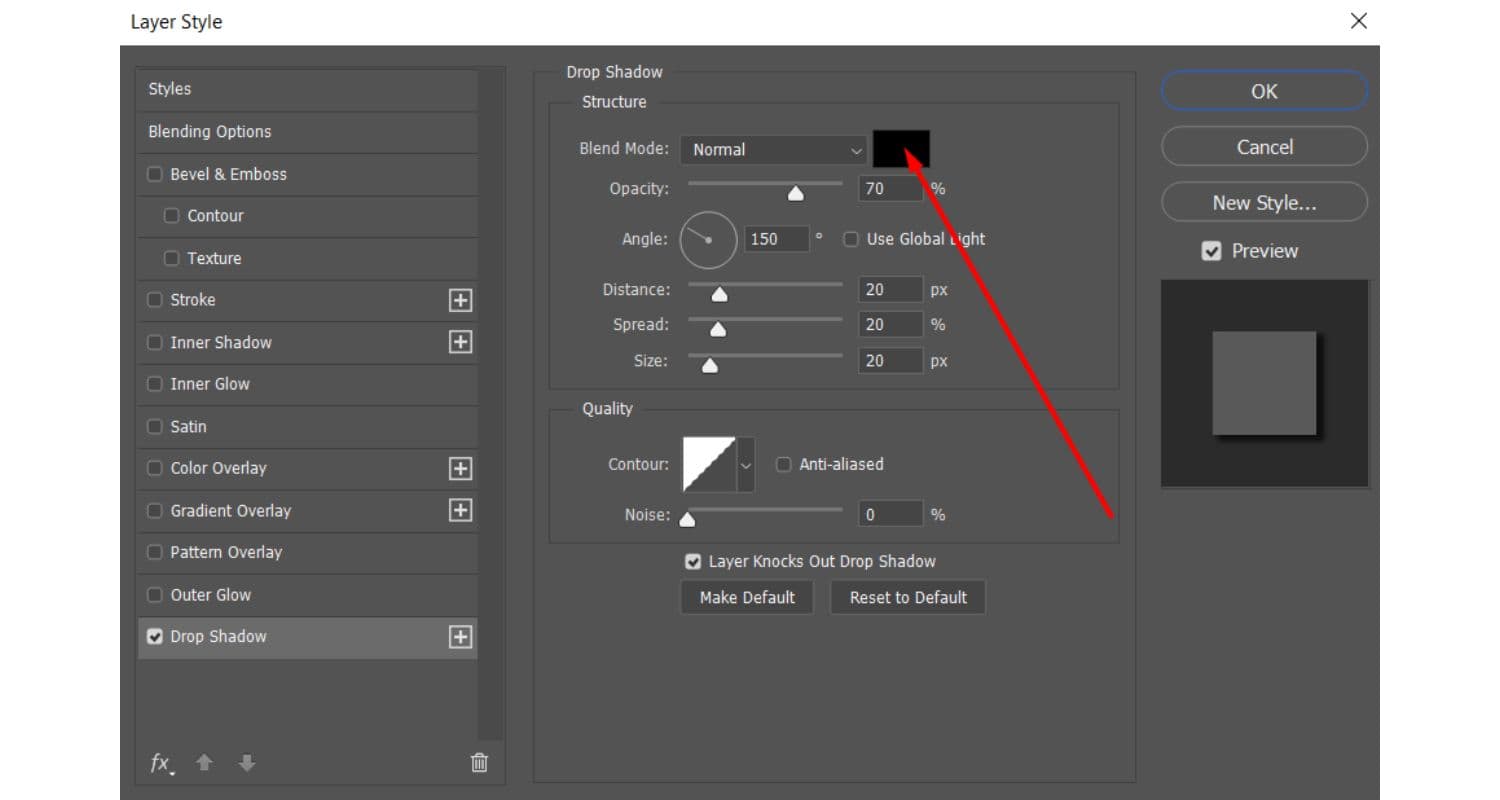
Applying Shadows:
- Select the text you need to add a shadow to.
- Click on “Organization” in the top menu.
- Pick “Drop shadow” from the dropdown menu.
- Change the shadow’s tone, straightforwardness, distance, point, and obscure range.
- Review the impact and make changes depending on the situation.
Adding Reflections:
- Select the text for which you need to add a reflection.
- Click on “Arrangement” in the top menu.
- Select “Reflection” from the dropdown menu.
- Alter the reflection’s size, straightforwardness, distance, and course.
- Survey the reflection impact and adjust it as you would prefer.
Using Boundaries and Tweaking Line Styles
Borders give a perfect and organized shift focus over to your text. This is the way to use walls successfully in Google Slides:
Adding Lines to Text:
- Select the Text Box or the text you need to frame with a boundary.
- Click on “Arrangement” in the top menu.
- Pick “Boundaries and lines” from the dropdown menu.
- Select “Line tone” and pick the ideal boundary tone.
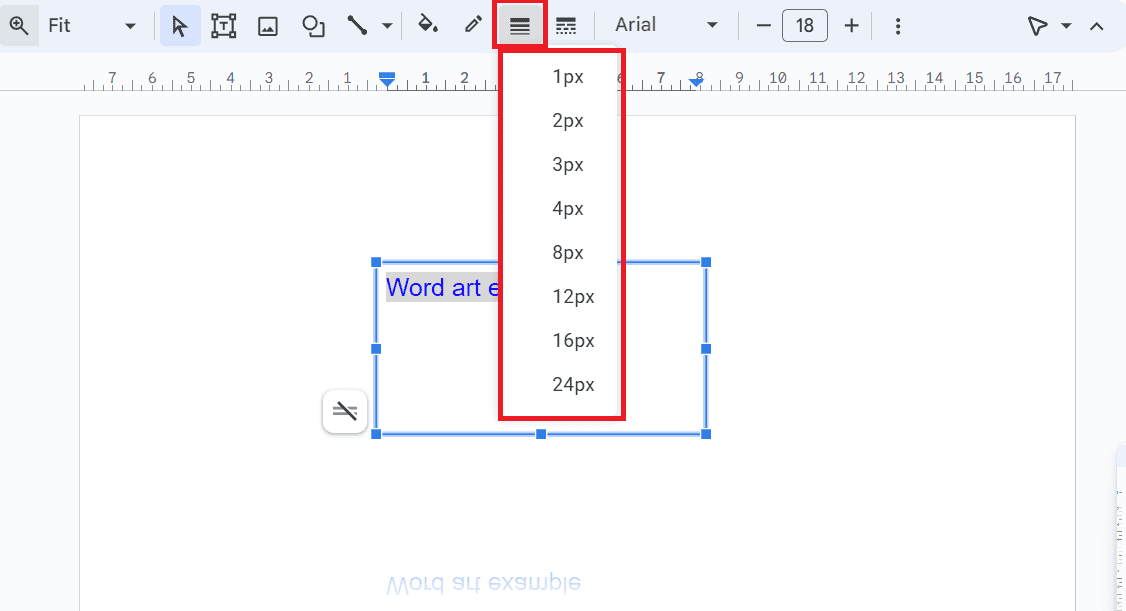
- Change the “Line weight” to control the thickness of the boundary.
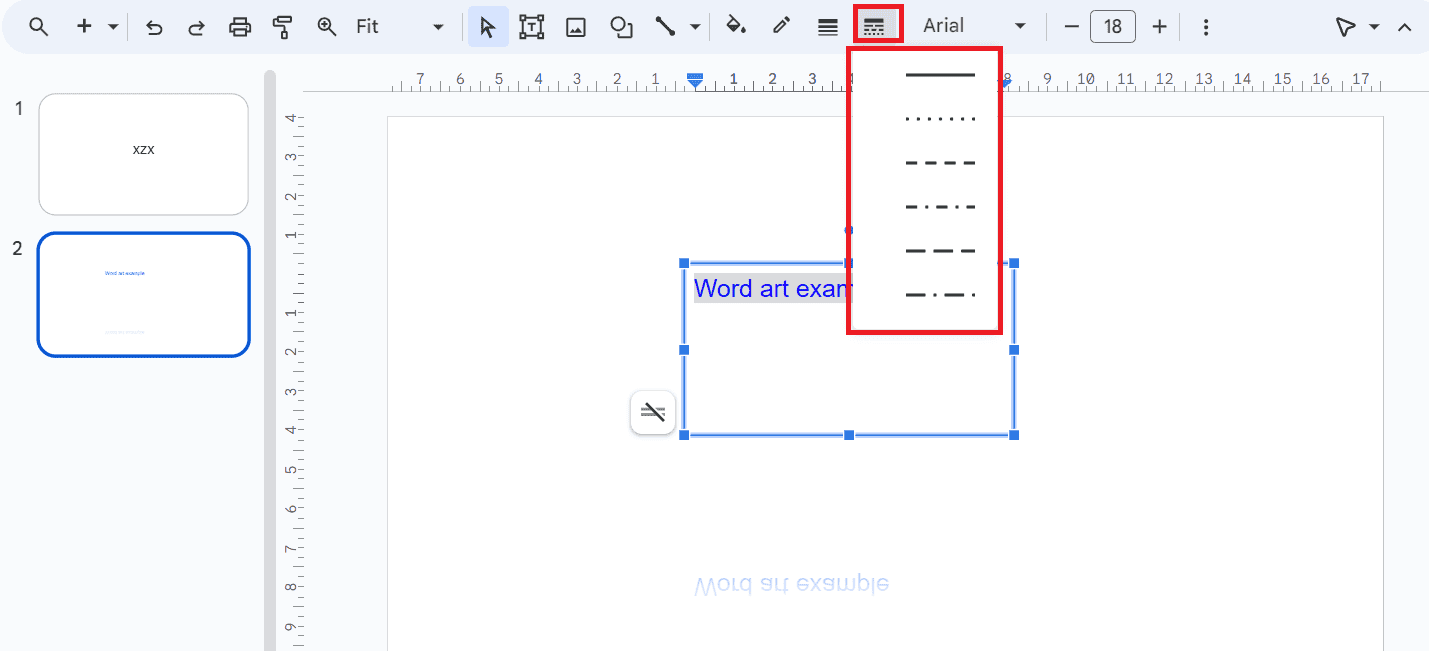
Altering Boundary Styles:
- Try different things with various boundary styles, like ran lines, spotted lines, or twofold lines, to accomplish the ideal enhanced visualization.
- You can likewise change the boundary tone to make a difference or match your slide’s variety plot.
Regularly Posed Inquiries About Text Framing in Google Slides
Text framing in Google Slides can bring up issues, particularly when clients plan to accomplish explicit impacts. This segment tends to normal inquiries connected with text framing.
Can I add images and envelope text by Google Slides?
Indeed, you can upgrade text illustrations with images in Google Slides. While you can’t straightforwardly draw on the text, you can embed images and shapes to make extra visual components. Images can be used for comments, embellishing parts, or creating custom diagrams around text.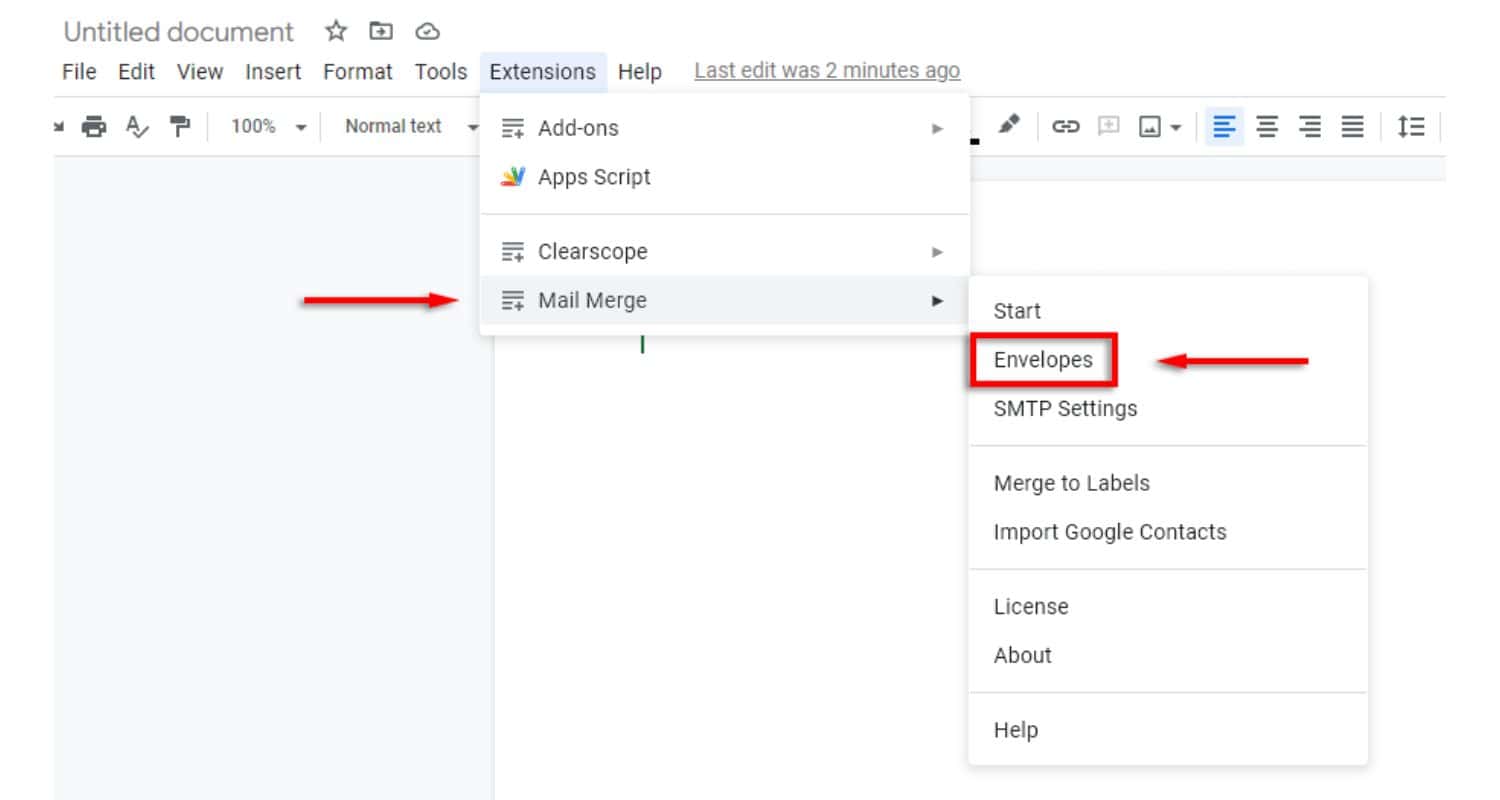 To do this, click “Supplement” in the top menu, then select “Image” and pick “New.” You can make your image and embed it into your slide afterwards.
Explore different storage options for your presentation images and files by better understanding Google Photos and One Drive.
Is Text Enclosing Conceivable by Google Slides?
Text wrapping, which permits text to stream around shapes or items, is not a local element in Google Slides. While you can’t fold text over bodies like in a word handling program, you can physically situate text boxes and shapes to accomplish a comparative impact. This might require a manual change to guarantee a tastefully satisfying format.
How to Add Strong Shadows to Text?
Adding striking shadows to Text in Google Slides can improve the Text’s perceivability and make it stick out. This is the way to accomplish this impact:
- Select the text you need to add a shadow to.
- Click “Organization” in the top menu.
- Pick “Drop shadow” from the dropdown menu.
- Change the shadow’s boundaries, including variety, distance, point, and obscure range, to make it strong and outwardly striking.
- Review the impact and calibrate it as you would prefer. A hazier shadow with a huge distance can make a strong impact.
How to Add and Redo Lines in Introductions?
To add boundaries to Text in Google Slides, follow these means:
- Select the text or item you need to frame with an edge.
- Click “Configuration” in the top menu.
- Pick “Boundaries and lines” from the dropdown menu.
- Select “Line tone” to pick the boundary tone.
- Change the “Line weight” to control the thickness of the boundary.
- You can likewise try different things with various boundary styles like run or twofold lines.
Can I Alter Boundary Styles and Colors?
Indeed, you can completely alter line styles and varieties in Google Slides to match your show’s plan and make explicit special visualizations. After picking “Line tone” and “Line weight,” you can explore different avenues regarding different boundary styles and change the variety to make a difference or fit the general variety plan of your slide.
Investigating Normal Issues with Text Illustrating
Text framing can, here and there, present difficulties in Google Slides. This segment resolves normal issues and gives arrangements.
Tending to Perceivability and Intelligibility Issues
If your framed text isn’t apparent, think about the accompanying:
- Guarantee there is sufficient difference between the text and its experience. Change the text tone and layout tone for better perceivability.
- Keep away from excessively complex foundation pictures that might slow down text meaningfulness.
- Change the shadow or reflection impacts to make a better difference.
Overseeing Text and Foundation Variety Differences
Overseeing a variety of contrasts is essential for Text illustration. To accomplish this:
- Use the variety picker to guarantee the text variety stands out successfully from the foundation. Light text on a dull foundation or vice versa is a typical methodology.

- Avoid using excessively comparative colors, as they can prompt unfortunate perceivability.
- Test your slides well and on different gadgets to affirm that the text is effectively clear.
Extra Tips for Imaginative Text border google slides
Lifting your text styling game in Google Slides goes past illustrating. This part dives into extra procedures and devices to upgrade your text’s visual allure and effect.
Investigating Extra Text Styling Choices
Gradient Fill for Text:
Rather than strong text tones, consider applying angle fills to your text. This can add profundity and aspect to your text, making it all the more outwardly captivating.
Text Transitions:
Consolidate Text changes for a powerful show. Use liveliness choices to present Text in imaginative ways, for example, flying in, zooming, or blurring.
Combining Fonts:
Blend and match text styles to make a difference and feature central issues.
Use an enriching textual style for headings and a spotless, decipherable style for body text.
Text Effects:
Investigation with text impacts like gleam, blueprint, and reflection. These unobtrusive impacts can make your text stand out without overpowering the crowd.
Advanced Shadowing:
For past basic shadows, consider using progressed shadowing impacts. Stack various shades with changing opacities to make perplexing text plans.
Using Google Slides Additional Items for Upgraded Text Styling
Extensis Text styles Addon:
The Extensis Text styles addon offers a huge library of text styles that can be incorporated into Google Slides.
Access exceptional and sleek text styles to make your text all the more outwardly engaging.
Icons by Thing Venture Addon:
Improve your text with symbols from the Thing Undertaking addon. Symbols can give a visual setting to your text and make it more useful and locking in.
Auto Plastic Conditions Addon:
If your show includes numerical conditions or logical text, the AutoPlastic Conditions addon helps you configure and show conditions flawlessly.
By investigating extra Text styling choices and using Google Slides for additional items, you can take your introductions to a higher level. Whether you’re hoping to make text impacts, join textual styles for difference, or upgrade your slides with intelligent components, these tips and devices give more opportunities for imaginative text styling in Google Slides.
To keep track of your tasks and schedules, explore Google Calendar vs Apple Calendar.
We hope that the above solutions resolve “how to outline text in google slides” query.
FAQS
How to add an outline to text in Google Slides?
To add an outline to text in Google Slides, select the text, click 'Format' in the top menu, choose 'Text outline,' and then select the outline color and thickness to customize it.
Does Google Slides text outline work on all devices?
Yes, Google Slides text outlining should work on all devices that support Google Slides, including web browsers, mobile apps, and desktop applications.
How to outline letters in Google Slides?
To outline individual letters in Google Slides, you'll need to create each letter as a separate text element and then apply text outlining to each letter individually to achieve the outlined effect.
How to outline a text box in Google Slides?
You can outline a text box in Google Slides by selecting the text box, clicking on 'Format' in the top menu, choosing 'Borders and lines,' and then customizing the line color and thickness to create the outline around the text box.
Conclusion
In conclusion, “How to outline text in Google Slides” is an easily resolvable query. Mastering the art of text outlining in Google Slides is a straightforward yet powerful way to elevate the visual impact of your presentations. By following these simple steps, you can create eye-catching and professional slides that captivate your audience and convey your Text with clarity and style. Learn
Also, explore whether Google images are free to use. and How to Transfer Ownership of a Google Drive Folder.
See Also: How To Turn Off Google Password Manager – Full Tutorial

Meet Carrie-Ann Skinner, our Apps & Games Editor with over 2 decades of experience in online and print journalism, specializing in all things tech.
