With more than 1 billion users now, Facebook is the largest social network in the world. The Facebook “Share” button is a fantastic tool for encouraging visitors to participate with your Profile page or Fan Page. You want to know how to enable the share button on Facebook. The Share Button is a fantastic method to have a message that “keeps on giving and going!” and to disseminate material from the Facebook Fan Page virally.
A user can write a comment, link to the page, & share it with all of their Facebook friends by clicking the “Share” button on your Site and custom Fan Page Tab. You can enable the share button on Facebook by editing the audience. By doing this, you provide your followers and friends the ability to share your content with others via the share button.
If you have created a Facebook post, it can be shared with your friends and followers. Yes, you can share it by following the methods below. It may happen if you set the right audience for a post. In this article, we will find out how to enable the share button on Facebook.
See Also: 6 Best Android Apps To Meet People | Social Apps In 2024
Contents
For desktop and mobile, the steps to modify a post’s audience are the same (iPhone, iPad, & Android phones).
- Find the post you wish to share on the Facebook group by opening it.
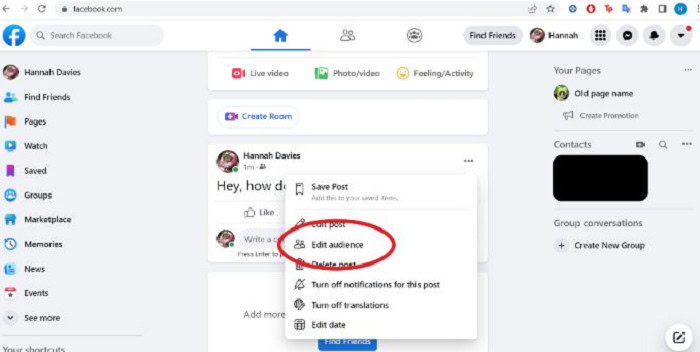
- After selecting the three dots, a menu will appear; choose “Edit Audience.”
- A popup labeled “Select Audience” will appear. Select “Public” at the top of this page.
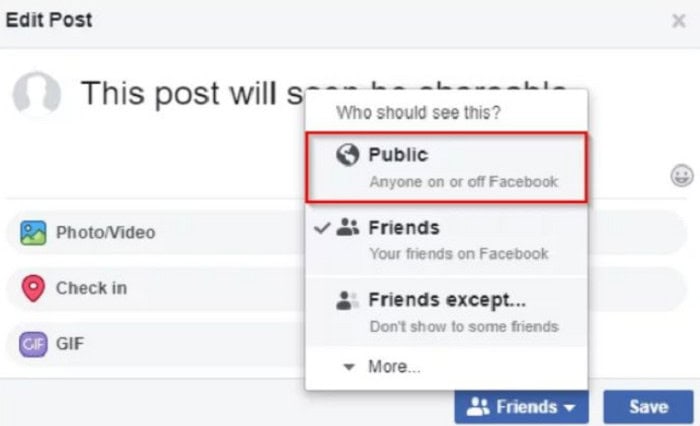
- You have enabled the share button.
You’re all set to move. Your followers and friends will see a share option for your post. They have access to disseminate your post everywhere. You can get the answer to your query about how to add a share button on Facebook.
What Does Facebook’s “Take A Break” Mean?
Using Facebook’s “Take a Break” feature, you may control which users’ posts display in your news feed and who has access to your account’s postings. You can disable this function to prevent Facebook search history from appearing in someone’s feed postings. You can also limit who can view your Facebook profile. This option may be appropriate if you no longer get along with someone but don’t want to block or unfriend them completely.
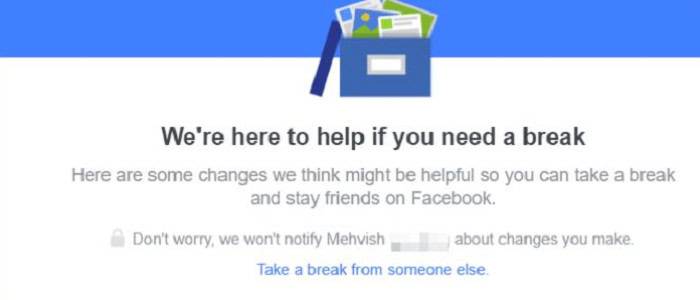
You can also decide who can see the posts where you and the other tagged person appear. The user is unaware that you created your profile using Facebook’s “Take a Break” feature.
How To Use The “Take A Break” Feature On Facebook
Launch a web browser on your computer to start using the service, then navigate to the Take a Break web page. Log into Facebook if you haven’t done so before. On the Take a Break page, click the text box, then type the name of the person you want to use the service for. When their name shows on the list, choose that person.
- You’ll find three choices on the next screen.
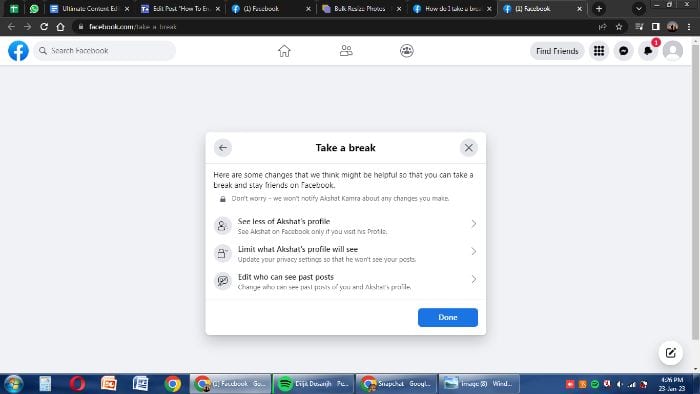
- Select what you want to do with the selected person’s profile here. Below, we’ll go over each choice. Select “See Less of [Person Name Profile” ]’s if you want to stop seeing the person’s postings in your feed. Turning on “Limit Where You See [Person Name Profile,” ]’s, you can prevent your news feed from showing postings from the chosen account.
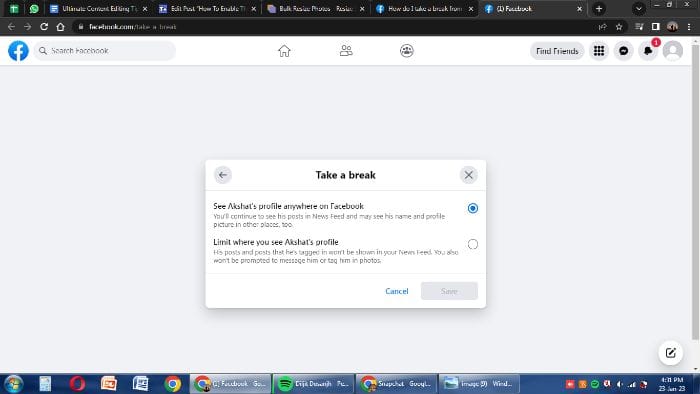
- Click “Save” next.
Next Steps to follow
- First, select “Limit What [Person Name Profile ]’s Will View,” allowing you to decide what information the other participant can see on your profile. Then, if you check the box next to “Hide Your Posts From [Person Name Profile,” ]’s your posts will be hidden from the selected user’s profile (unless you have tagged them in a post).
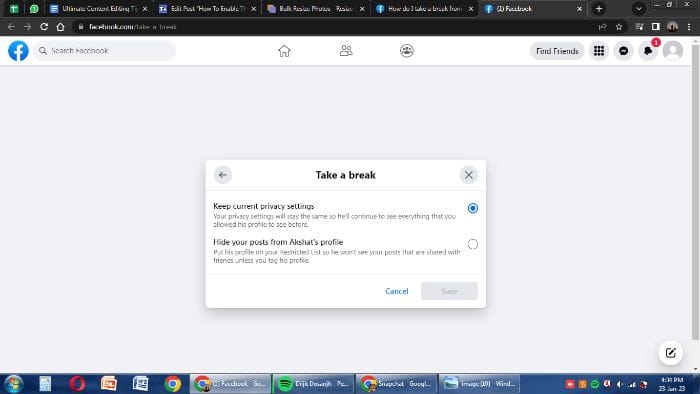
- Then click “Save.”
- Recall that this person can see any of your posts set to Public. Using the final option, you can modify the visibility of posts in which you and the chosen person are tagged. By selecting “Edit Who May See Past Posts,” you can get this option. Select “Edit Individual Posts” to modify the privacy settings for each of your posts individually. (Facebook will open a new browser tab and a web page. You can view and modify the privacy options for each of your photos on Facebook on this page.)
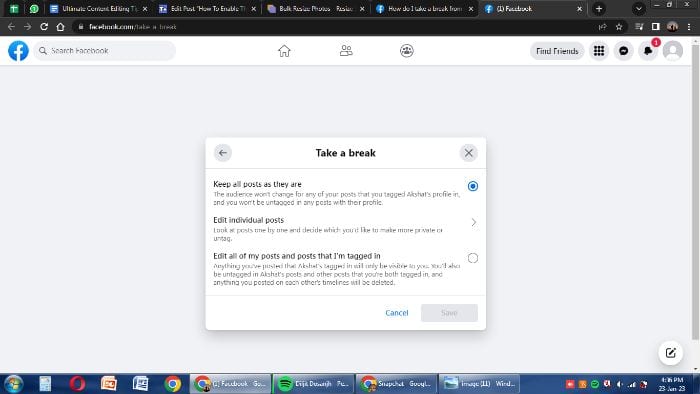
- Enable “Edit All My Posts & Posts I’m Tagged In” to make your posts invisible to everyone but those you have tagged.
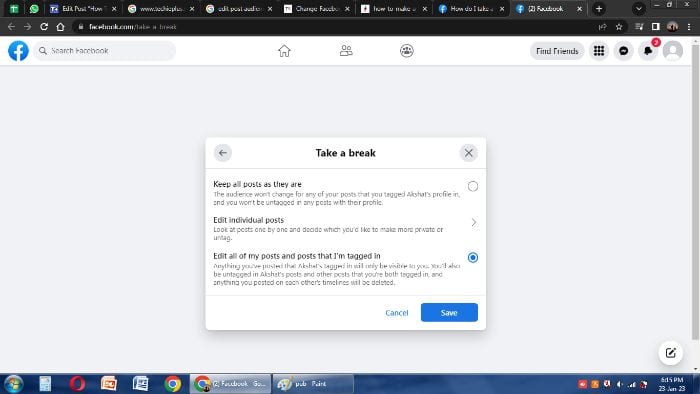 By doing this, you will be untagged from the postings where you & the other person are both tagged, then take down any postings you have posted on each other’s timelines.
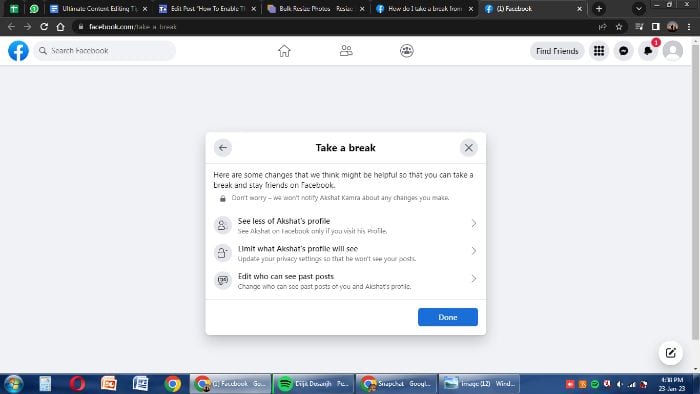
- After doing the changes back to the “Take a Break” window, click “Done” in the bottom-right corner.
See Also: 4 Quick Ways To Transfer Photos From Android To Mac | 2024
FAQs
A Facebook share button can be understood in one of two ways. A button on your website lets people quickly share your material on Facebook with just a single click. A function on Facebook that enables users to share an existing post made by another Facebook member.
If we're talking about sharing content from Facebook, like when you read a friend's post and wish to share it but cannot, the issue is ultimately your friend's privacy settings. If your friend's privacy is set to 'Friends' only, only their friends can read such postings. You can't share since doing so would make the post visible to all your friends, going beyond what the original poster's privacy settings permit.
The only thing needed to enable sharing on Facebook is a slight adjustment to your privacy settings: Your postings will be shareable on Facebook if you make them public (shareable to friends-of-friends). Having said that, if another person shares your webpage, There is nothing you can do to make a blog post or other content from your site more shareable; the privacy preferences of the original contributor always govern sharing.
The simplest way to share a website, blog, or other URL on Facebook is by using a Facebook share button, which enables sharing to Facebook with just one click. From this, you will also know How to turn on share on Facebook. You can share right away using your logged-in Facebook profile by clicking the Facebook logo box below or to the left of the page on a website allowing the Facebook share button.
One of the simplest ways to increase website shares is to enable the Facebook share button. You can choose between sticky share buttons, which are fastened to the side of the screen, and inline share buttons, which are placed at a precise point (for example, beneath an article header). In either case, they are easily accessible and usable by guests
See Also: Top 7 Free Facebook Proxy Sites To Unblock Facebook
Conclusion
Facebook allows you to communicate with friends & family by sending messages and updating your status. You can also distribute various forms of content, including pictures and links. However, distributing content on Facebook differs slightly from other forms of online communication. The information you share on Facebook is more public than on email or instant messaging, so more people will typically see it. We have this detailed guide about enabling the share button on Facebook and how to allow sharing on Facebook.
It’s crucial to realize that Facebook is created to be more open & sociable than conventional communication technologies, even though it has privacy options to restrict who may see the items you share.

Meet Carrie-Ann Skinner, our Apps & Games Editor with over 2 decades of experience in online and print journalism, specializing in all things tech.
